3D Slicer is an open source, 3D reconstruction package that is intended to work with tomographic data of all types - particularly CT and MRI. It excels at making high-quality surface reconstructions (although a volume rendering module is nearing maturity, too), volumetric measurements, and all other sorts of things. Oh yeah, and it's FREE. Slicer became the workhorse for my dissertation (and many others at my graduate institution).
The documentation was pretty incomplete (and still is, in some areas) when I started with Slicer. So, I spent long hours of just trying to load data and get a simple model. Things are better now, but because Slicer is geared for the biomedical crowd, most of the tutorials for the program that are available on-line follow biomedical examples. So, I decided to put together a Slicer tutorial that would benefit paleontologists.
The present tutorial, issued in a series of posts, follows a paleo-oriented example for using Slicer version 3.2, the latest official release. Version 3.3 is available in alpha form, and no major changes in the interface are evident. So, you should be able to follow this regardless of your version. Note that the 2.X series has a pretty different interface, although many of the fundamentals are the same (even if you have to look under different menus or toolbar buttons).
The screenshots used here were taken from the October 1, 2008 build of Slicer 3.2, running under Ubuntu Linux 8.04. But, all of the gizmos and gadgets should run just the same under Windows or the Mac OS.
Let's get started!
Starting Assumptions
This tutorial assumes that you (the reader) have some measure of computer competency - you know how to install programs, unzip files, and the like. It also assumes that your computer has enough processing power to handle the data sets. Memory, rather than processing power, is the important thing - you'll probably want at least a gig of RAM, and more is always better.
Getting Slicer
Visit the Slicer Download page, for a whole set of instructions and options. New users probably want to get a Stable Release, but those who want the latest bleeding-edge features should opt for a Nightly Build or Snapshot. Most operating systems are represented (Mac, Windows, Linux, and Solaris). As mentioned above, you'll want at least Slicer 3.2 for the purposes of this tutorial.
Getting an example data set
The dataset used in this tutorial is that for AMNH 5405, a Euoplocephalus skull. These data have been generously posted to the web by Larry Witmer, available here. To begin, download the data and unzip them in the directory of your choice. In my case, I put them on my Desktop in my home directory, and renamed the folder to AMNH5405.
Starting Slicer
Depending on how you installed Slicer, you may access it from the Windows menu, or the folder into which you installed it, or some other place. In my case, I have it installed into a folder called Slicer3.2, in my home folder. In order to start Slicer, I open the folder and double-click on the "Slicer3" icon. The program starts up with a friendly welcome screen, while various modules are loaded, and then you see the blank user interface - no data are loaded yet.
The screen shots accompanying the tutorial from here on out will appear just after the relevant steps.
You'll note that as you move your mouse around, various context helps come up to indicate what each icon does. Because this is a "bare bones" tutorial, we'll only be looking at the ones needed for the task at hand.
 Loading Your Data
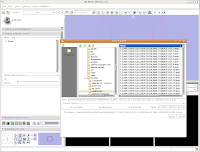
Let's dive right in! The first step is to load the CT data that we want to reconstruct. There are one or two ways of loading data, but let's go with the simplest. Under the "File" menu, choose "Add Volume." Now, a new window appears, with your directory structure on the left and a list of files on the right. In the left part, navigate to the directory that contains your data (AMNH5405, in this case). Click on it, and then you should see a whole list of DICOM files. Click on the one at the top of the list, and then hit the "Apply" button at the bottom of the window.
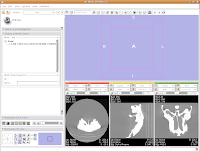
 Wait patiently as the data are loaded - depending on the speed of your machine, this may take a little while. It took about 13 seconds on my relatively high-powered computer. Now, you should see your data!
 Here ends the first part of the tutorial. The next post will continue with "Looking at the Data."


Great set of posts Andy. Thanks for putting this up. Casey
ReplyDeleteI've already said this over on SV-POW!, but here it is again for those who don't read that site:
ReplyDeleteI wasn't able to load the DICOM files from the scan of my brachiosaur cervical into Slicer: it crashes when trying to load them (segmentation fault) even though it works fine on the ankylosaur skull that Andy walked us through in this tutorial. I fixed this by gluing the 300-odd files together into a single stack file that Slicer was able to read. For the benefit of anyone else who needs to do this, the command (on a Ubuntu Linux box) was: medcon -f *.dcm -c dicom -stack3d -n -qc
If you're into free software, you should also take a look at 3DnetMedical - they provide a powerful diagnostic workstation "in the cloud" (so no mucking about with software) and it's free to open 2 cases per day. You can very quickly build up an online library. The cool thing is you can then share it with anyone and they can view it too.
ReplyDelete